Approval Workflows for Item Journals in Microsoft Dynamics 365 Business Central

With the latest updates in Microsoft Dynamics 365 Business Central, Item Journals now support approval workflows, bringing the same level of control that previously existed only for General Journal batches.

This feature introduces stronger governance and internal control for inventory transactions, ensuring that critical stock movements are reviewed before being posted.


Why This Feature Matters

Inventory transactions such as adjustments, consumption, or production output directly impact stock valuation and financial reporting.

Without an approval process, users could accidentally or intentionally post incorrect entries.

The new approval workflow capability for Item Journals helps organizations:

  • Enforce inventory control policies
  • Prevent unauthorized postings
  • Improve audit compliance
  • Reduce operational errors

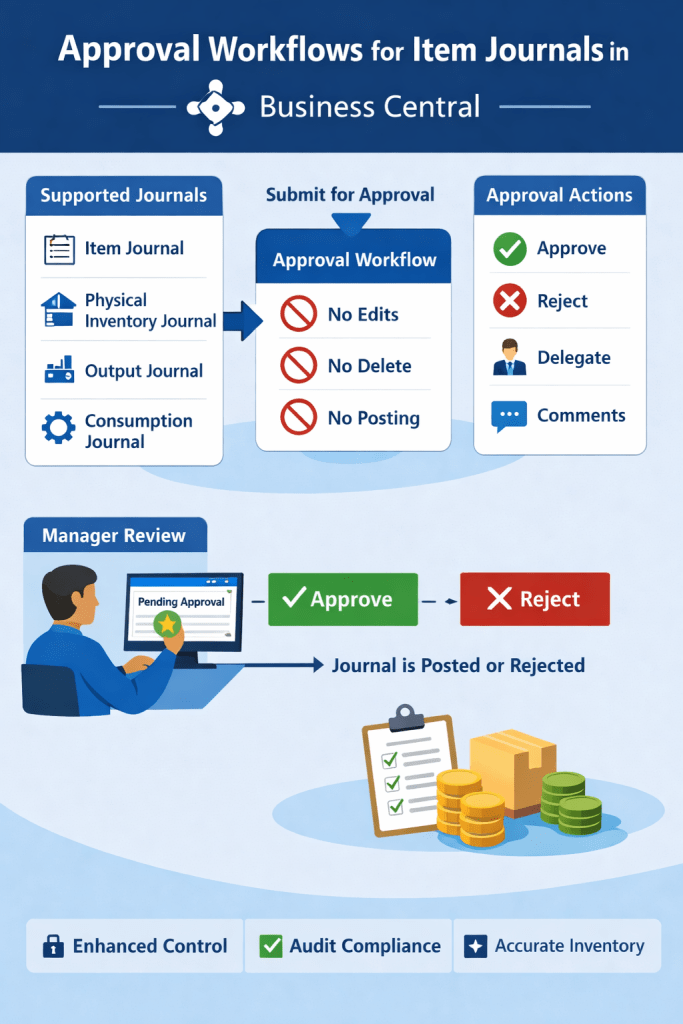
Journals That Support Approval Workflows

Approval workflows can now be applied to the following journals:

Article content
Article content

How the Approval Process Works

When a user submits a journal batch for approval, the system creates an approval entry.

During the approval process:

  • The journal cannot be edited
  • The journal cannot be deleted
  • The journal cannot be posted

These restrictions remain until the approval request is approved or canceled.

This prevents any changes that could bypass the approval process.

Article content

Example Scenario

Consider a manufacturing company using the Consumption Journal to record raw material usage.

Without approval:

A user could mistakenly consume 100 units instead of 10, impacting inventory valuation.

With approval workflows:

  1. The journal batch is submitted for approval
  2. A manager reviews the entries
  3. The manager approves or rejects the request

This ensures inventory accuracy and financial integrity.

Key Benefits

The introduction of approval workflows for Item Journals provides several advantages:

✔ Stronger internal control over inventory transactions

✔ Reduced risk of incorrect stock postings

✔ Better compliance with audit and governance requirements

✔ Consistent approval processes across financial and inventory journals

The ability to apply approval workflows to Item Journals in Microsoft Dynamics 365 Business Central is a valuable enhancement for organizations managing inventory and manufacturing operations.

By ensuring that sensitive inventory transactions are reviewed before posting, businesses can maintain accurate stock records and stronger operational control.

How to Create and Use AI Agents in Microsoft Dynamics 365 Business Central

Artificial Intelligence is rapidly expanding inside enterprise systems. With Microsoft Dynamics 365 Business Central v27.4, Microsoft now exposes a first-class agent creation capability — allowing you to define, configure, and run intelligent agents directly inside your ERP environment.

In this blog, we’ll walk through how agents work, the creation experience based on what’s available in the product today.

🚀 What Are AI Agents in Business Central?

In Business Central, AI agents are software assistants that can:

  • Understand natural language instructions
  • Execute business tasks against Business Central data
  • Follow configured rules and permissions
  • Operate autonomously or with human review

These agents sit at a higher abstraction layer than traditional workflows — they interpret intent and then coordinate actions across standard Business Central APIs, pages, and logic.

🛠 Step-by-Step: Creating an Agent in Business Central

Here’s a distilled implementation walk-through based on the video and documentation:

1. Enable Agent Capabilities

Before you can create agents, you must:

  • Enable Custom Agent capability in your Business Central environment
  • Have a sandbox tenant for experimentation
  • Ensure you have relevant permission sets such as AGENT-ADMIN and AGENT-DIAGNOSTICS applied to your user account

2. Start the Agent Wizard

Once enabled:

  1. Click the “Agent” icon in the role centre
  2. Choose Create New Agent
  3. Select a template (e.g., Sales Validation) or start from scratch
  4. Provide:

The installer guides you through setting up:

  • Purpose
  • Profile
  • Permissions

Agents are treated like users, so they must have clear permissions defining what Business Central data they can access and act on.

3. Define Agent Instructions

This is the heart of the agent. Instructions are plain-language “task definitions” that guide what the agent should do when triggered.

A basic instruction structure looks like:

  • Introductory purpose
  • Step-by-step tasks
  • Expected output or result

Example :

“You are a Business Central agent. When invoked, check all overdue receivables and create a work list of customers where the balance exceeds credit terms.”

Agents use this instruction to orchestrate actions, call APIs, or run logic — all while respecting security.

4. Configure Execution Profile

Each agent runs under a specific profile:

  • Choose standard or custom roles used in Business Central
  • Profiles determine UI access and actions available to the agent
  • Permissions are tied to the profile

Profiles limit what the agent can read or write — essential for governance.

5. Test and Activate

Once configured:

  1. Use the Agent Task Playground to simulate tasks
  2. Review output and refine instructions
  3. When ready, activate the agent
  4. The agent can run immediately or wait for a trigger

In preview today, scheduling and automated triggers are limited — most agents are started manually or via designated events.

📍 Real Business Examples

Agents being highlighted in Business Central include:

🔹 Sales Order Agent

  • Monitors a designated email inbox
  • Parses incoming customer requests
  • Locates or creates the customer record
  • Verifies item availability
  • Generates and sends quotes or orders via email
  • Keeps the human reviewer in the loop for approvals and changes

This helps sales teams minimize manual order entry by automating standard order processing tasks.


🔹 Payables & AP Agents

Similar to sales agents, agents can automate Accounts Payable workflows by:

  • Monitoring invoice email inboxes
  • Extracting invoice data using AI
  • Drafting vendor invoices inside Business Central
  • Letting users review and finalize postings

This frees AP teams from repetitive data entry and improves efficiency.

AI agents in Microsoft Dynamics 365 Business Central are more than an experiment — they’re a new paradigm for embedding intelligence inside operational ERP processes. Rather than writing bespoke automation, you define business intent, and the system interprets and operationalizes it — provided you set the rules, permissions, and expectations correctly.

Protecting Sensitive Data Made Easier: Introducing ‘Concealed’ Text Field Type in Business Central Wave 2 2025

Data privacy and security have become paramount concerns for businesses across all industries. With increasing regulatory requirements and growing awareness of data protection, organizations need robust yet user-friendly solutions to safeguard sensitive information. Microsoft’s Dynamics 365 Business Central Wave 2 2025 introduces a game-changing feature that addresses this challenge: the new ‘Concealed’ text field type with the innovative Mask Type property.

The Challenge: Balancing Security and Usability

Traditionally, we faced a dilemma when handling sensitive data fields. The existing ExtendedDataType = Masked property offered security by displaying field values as dots, but this approach had limitations:

  • Always hidden: Once masked, the data remained permanently concealed, even from authorized users
  • Poor user experience: Users couldn’t verify entered data, leading to potential input errors
  • Limited flexibility: No option to reveal data when legitimate access was needed

These limitations created friction between security requirements and practical usability, forcing developers to choose between protecting sensitive data and maintaining a smooth user experience.

Business Central Wave 2 2025 introduces the new MaskType enum property, revolutionizing how we handle sensitive data display. This property offers two distinct values:

MaskType Values Explained

None (Default)

  • Standard behavior where field values are fully visible in the UI
  • No masking or concealment applied
  • Suitable for non-sensitive data fields

Concealed

  • Field values are hidden by default, appearing as masked dots
  • Users can reveal the actual value through an explicit action
  • An interactive “eye” button appears next to the field for toggling visibility
  • Perfect balance between security and accessibility

Implementing the concealed field type is straightforward. Here’s how to configure it in your AL code:

field(50100; "Sensitive Data"; Text[100])
{
    Caption = 'Sensitive Information';
    MaskType = Concealed;
}

When rendered in the UI, this field will display:

  • Masked dots by default (●●●●●●●●)
  • An eye icon button for revealing/concealing the value
  • Smooth toggle animation between hidden and visible states

Supported Field Types

The MaskType = Concealed property works with:

  • Text fields: For sensitive textual information
  • Code fields: For confidential codes and identifiers
  • Decimal fields: For sensitive numeric values with decimals
  • Integer fields: For confidential whole numbers

Supported Page Types

The concealed functionality is available on:

  • Document pages: Sales orders, purchase orders, etc.
  • Card pages: Customer cards, vendor cards, item cards
  • Not supported: List page repeaters and grid controls

The introduction of the ‘Concealed’ text field type with the MaskType property in Business Central Wave 2 2025 represents a significant advancement in data protection capabilities. This feature successfully bridges the gap between security requirements and user experience, providing organizations with a flexible, user-friendly approach to protecting sensitive information.

Stay tuned for more.

Optimizing Business Central Reports with the DataAccessIntent Property

When developing reports in Microsoft Dynamics 365 Business Central, performance and scalability are crucial—especially in cloud environments where system efficiency impacts everything from responsiveness to cost. One often-overlooked feature that can significantly enhance report performance is the DataAccessIntent property.

What Is DataAccessIntent?

The DataAccessIntent property is available on report objects in AL. It specifies how a report should access the database—whether it’s read-only or read-write.

The property supports two values:

  • DataAccessIntent = ReadOnly
  • DataAccessIntent = ReadWrite

ReadOnly

When you set DataAccessIntent = ReadOnly, you are explicitly telling the platform that your report only needs to read data from the database and will not perform any write operations.

Why is this important?

  • Better Performance: In Business Central SaaS, reports marked as ReadOnly can run on read-only replicas of the database. This reduces the load on the primary (read-write) database and enhances scalability.
  • Improved Report Execution Time: Since queries are routed to optimized replicas, report rendering can be faster and more efficient.

ReadWrite

If your report needs to modify data during execution—a rare scenario—you should use DataAccessIntent = ReadWrite. This forces the report to run on the primary database.

However, you should avoid using ReadWrite unless absolutely necessary because:

  • It eliminates the benefit of using read replicas.
  • It may degrade performance, especially under high concurrency.

When to Use Each

ScenarioUse ReadOnly?Use ReadWrite?
Standard data listing/reporting
Reports that update records
Diagnostic or audit reports

How to Set DataAccessIntent in AL

report 50100 "Customer Balance Report"
{
    DataAccessIntent = ReadOnly;

    dataset
    {
        dataitem(Customer; Customer)
        {
            column(Name; Name) { }
            column(Balance; "Balance (LCY)") { }
        }
    }

    layout
    {
        // Define RDLC or Word layout
    }
}

By default, if you don’t specify the property, it behaves as ReadWrite. So it’s a good practice to explicitly set it to ReadOnly when applicable.

Important Considerations

  • The DataAccessIntent property is only a hint to the Business Central server. The server may not always be able to use a read-only replica, even if the property is set to ReadOnly.
  • If a report with DataAccessIntent set to ReadOnly attempts to modify data, a runtime error will occur.
  • The DataAccessIntent property can be overridden by the user through the “Database Access Intent List” page in Business Central.

In short: if your report doesn’t write data, use DataAccessIntent = ReadOnly. It’s an easy win for performance and best practice compliance.

Stay tuned for more….

How to Define Allowed Languages Per Environment in Business Central 2025 Wave 1

With the release of Business Central 2025 Wave 1, BC continues to enhance administrative control and governance features. One of the most welcome additions for global organizations is the ability to limit the available language options per environment. This is a game-changer for companies seeking better localization control, user experience consistency, and governance.

🚀 What’s New?

Until now, Business Central environments would display all installed languages by default, allowing users to switch freely. While flexibility is good, it posed problems in certain scenarios:

  • Local subsidiaries wanting only their national language.
  • Confusion due to long lists of unused language options.
  • Incorrect UI labels or translations due to unintended language selection.

Wave 1 2025 introduces the ability to define which languages are allowed per environment. Admins can now limit language choices for users based on the business unit, geography, or internal policy.

🔧 How to Configure Allowed Languages

To define allowed languages for a specific environment, follow these steps:

  1. Sign in to the Business Central
  2. Navigate to the new section: “Allowed Languages”.
  3. From the list of installed languages, check the boxes for only those you wish to allow.

Once applied, users in this environment will only see the allowed languages in their My Settings > Language dropdown.

This new feature may seem minor at first glance, but for global businesses and IT admins, it’s a powerful tool for consistency, control, and compliance. Whether you’re managing multiple countries, brands, or test environments, defining allowed languages per environment helps streamline operations and avoid confusion.

Stay tuned for more..

Generate launch.json from the Web Client in Business Central – Wave 1 2025

With the 2025 Wave 1 release of Microsoft Dynamics 365 Business Central, developers get a significant productivity boost: the ability to generate a launch.json file directly from the Web Client! 🎉 This is a feature that eliminates the need to manually configure environment settings in Visual Studio Code (VS Code), especially useful when working across multiple environments or containers.

💡 What is launch.json?

In AL development for Business Central, the launch.json file defines how your AL project connects to your Business Central environment. It includes settings like:

{
  "name": "Your Environment",
  "type": "al",
  "request": "launch",
  "server": "https://your-environment-url",
  "serverInstance": "BC",
  "authentication": "UserPassword",
  "tenant": "your-tenant-id"
}

You can now generate the launch.json configuration directly from the Web Client using just a few clicks. No more copying URLs, figuring out authentication types, or guessing server details.

🔧 Steps to Generate:

  1. Log into your Business Central Web Client.
  2. Navigate to the Help & Support page (? page=134).
  3. Scroll down to the Troubleshooting section.
  4. Look for the new Download launch.json button (or similar option).
  5. Click it – a launch.json file will be downloaded, pre-filled with your current environment’s configuration.

Second option will be navigate Installed extensions and download launch.json

The introduction of the launch.json generation feature in the Business Central Wave 1 2025 web client is a welcome addition for AL developers. It promises to streamline the initial setup process, reduce configuration errors, and enhance overall development efficiency.

Stay tuned fore more.

Business Central 2025 Wave 1 (BC26): Check Total Purchase Amounts on Documents

The Business Central 2025 Wave 1 (BC26) release introduces a valuable feature aimed at enhancing the accuracy and efficiency of accounts payable processes: “Check Doc. Total Amounts”. While seemingly simple from a user perspective, but powerful addition that helps users validate purchase documents before posting.

At its heart, “Check Doc. Total Amounts” is designed to prevent posting discrepancies between the manually entered total amounts on purchase document headers and the calculated total amounts based on the individual purchase lines. This helps ensure that the data within Business Central accurately reflects the external vendor invoices, minimizing potential errors and reconciliation issues.

Implementation Details:

Setup: The functionality is controlled via a new option within the Purchases & Payables Setup page. Administrators need to explicitly enable the “Check Doc. Total Amounts” toggle. This opt-in approach ensures that existing environments are not impacted unless the feature is intentionally activated.

New Fields: Upon enabling the feature, two new fields become visible on the Purchase Invoice and Purchase Credit Memo pages:

  • Doc. Amount Incl. VAT: This field is intended for users to enter the total amount, including VAT, as stated on the vendor’s document.
  • Doc. Amount VAT: This field allows users to enter the total VAT amount as per the vendor’s document.

Automatic Calculation: When a user enters a value in the “Doc. Amount Incl. VAT” field, the system automatically calculates and populates the “Doc. Amount VAT” field based on the VAT rates applied to the individual purchase lines. Conversely, if the user enters the “Doc. Amount VAT”, the “Doc. Amount Incl. VAT” is automatically calculated.

Validation on Posting: The crucial technical aspect lies in the posting validation logic. When a user attempts to post a Purchase Invoice or Purchase Credit Memo with the “Check Doc. Total Amounts” feature enabled, Business Central performs the following checks:

  • It calculates the sum of the “Amount Including VAT” for all individual purchase lines.
  • It calculates the total VAT amount based on the VAT entries of the purchase lines.
  • It compares these calculated totals with the values entered in the “Doc. Amount Incl. VAT” and “Doc. Amount VAT” fields on the document header.

Error Handling: If the calculated total amounts from the lines do not match the manually entered amounts on the header, the system will prevent posting and display an error message to the user. This forces a review of the purchase lines and header information to identify and rectify any discrepancies before the document can be posted.

The “Check Doc. Total Amounts” feature in Business Central 2025 Wave 1 (BC26) is a welcome addition for improving the accuracy of purchase document processing.

Stay tuned for more.

File.ViewFromStream in AL: Display Text Directly from Stream

Microsoft Dynamics 365 Business Central 2025 Wave 1 continues to improve its developer experience with handy new features. One of the exciting additions in this release is the File.ViewFromStream method — a simple yet powerful function that enhances how developers interact with files stored in memory.

In the current versions of Business Central, when you need to view an attached document, a report output, or an incoming file, the typical process involves downloading the file first and then opening it with an external application. This can be time-consuming, especially when dealing with multiple files or when you simply need a quick glance at the content. Switching between applications disrupts your workflow and can feel inefficient.

📘 What is File.ViewFromStream?

The new method File.ViewFromStream(Stream: InStream,Text[,Boolean]) enables developers to open or preview a file directly from a stream, without having to save it to a temporary physical file.

This is a major convenience when working with files generated on the fly — such as PDFs, Excel files, or text reports — especially in scenarios where users just need to view or download the file rather than save it on the server.

Syntax

[Ok := ]  File.ViewFromStream(InStream: InStream, FileName: Text [, AllowDownloadAndPrint: Boolean])

🛠 Example:

procedure ShowGeneratedReport()
var
    TempBlob: Codeunit "Temp Blob";
    OutStream: OutStream;
    InStream: InStream;
    ReportContent: Text;
begin
    ReportContent := 'Hello from AL!' + Format(CurrentDateTime) + '\nThis is a preview of your text report.';

    TempBlob.CreateOutStream(OutStream);
    OutStream.WriteText(ReportContent);

    TempBlob.CreateInStream(InStream);
    File.ViewFromStream(InStream, 'ReportPreview.txt', true);
end;

💼 Use Cases

Here are some scenarios where ViewFromStream can be a game-changer:

  • Previewing customer invoices or sales reports generated on-demand.
  • Opening files attached in workflow approvals.
  • On-the-fly document generation in extensions or apps.

The File.ViewFromStream method offers a powerful and user-friendly way to present stream content directly within Dynamics 365 Business Central. The File.ViewFromStream method is a lightweight, client-friendly way to present text content on the fly in Business Central.

Stay tuned for more.

Production Order Cancellations: Reversing Consumption in Business Central V26

Production orders are the backbone of manufacturing operations, but sometimes, plans change. Orders need to be cancelled, and when those orders have already consumed materials, things can get tricky. Business Central V26 has stepped in to simplify this process, offering a more streamlined way to reverse consumption and cancel production orders. Let’s explore how this works.

Imagine you’ve started a production order, materials have been consumed, and then, for whatever reason, the order needs to be scrapped. In previous versions of Business Central, simply deleting the order wasn’t an option. The system needed a way to accurately reverse the consumption entries to maintain inventory and financial integrity. This often involved manual adjustments and could be a time-consuming, error-prone process.

Business Central V26: Simplifying the Reversal:

Enter the “Reverse Production Order Transaction” action in Business Central V26. This feature provides a more efficient and accurate way to undo consumption and output transactions, making production order cancellations less of a headache.

How it Works:

  • Reversing Item Ledger Entries:
    • When you use the “Reverse Production Order Transaction” action, Business Central generates reversing item journal lines.
    • These lines effectively negate the original consumption entries, returning the materials to inventory.
  • Handling Output and Capacity:
    • The system also reverses output and capacity entries, including quantities, scrap, setup time, and run time.
    • This ensures that all related ledger entries are accurately adjusted.
  • Accurate Ledger Updates:
    • The system applies these reversals to the original ledger entries, maintaining precise inventory and cost records.

After reversal of production order you can finish production order without output. To achieve this you need to enable the setup on Manufacturing setup

Activate the Finish Order Without Output toggle in the Manufacturing Setup page.

Business Central V26’s enhanced capabilities for reversing production order transactions represent a significant step forward in simplifying production management. By automating the reversal process, manufacturers can save time, reduce errors, and maintain accurate inventory and financial records. This feature is a valuable addition to the Business Central , making production order cancellations less of a burden and more of a seamless operation.

Stay tuned for more updates.

Preview PDFs Directly in Business Central Web Client (v26)

With the release of version 26, a significant productivity boost has arrived: direct PDF attachment previews within the web client. No more downloading, opening external viewers, or switching between applications. This streamlined experience lets you access and review crucial documents instantly, right within your Business Central workflow.

What Does This Mean For You?

Imagine you’re processing a purchase order and need to quickly verify the attached vendor invoice. Previously, you’d have to download the PDF, open it in a separate application, and then return to Business Central. This process was time-consuming and disruptive.

Now, with the new preview functionality, you can:

  • View PDFs directly in the FactBox: When a PDF is attached to a record (like a sales order, purchase invoice, or customer card), you can preview it instantly in the FactBox without leaving the page.
  • Save time and improve efficiency: Eliminate the need for downloads and external viewers, allowing you to focus on your core tasks.
  • Enhance collaboration: Quickly share and review documents with colleagues, streamlining approvals and decision-making.
  • Enjoy a seamless user experience: The integrated preview functionality provides a more intuitive and efficient workflow.

How Does It Work?

The new feature leverages the browser’s built-in PDF rendering capabilities. When you click on a PDF attachment in the FactBox, the document opens directly within the Business Central web client, allowing you to:

  • Scroll through pages.
  • Zoom in and out.
  • Search for specific text.

This feature is enabled by default in Business Central version 26. Simply open a record with a PDF attachment, and you’ll see the preview option in the FactBox.

For Developers:

  • Microsoft has added the following AL methods to enable this functionality.
    • File.ViewFromStream (for Business Central online)
    • File.View (for Business Central on-premises)