With the release of Business Central Wave 2 2021 aka BCV19 lot of new features has been added to make life easier of developer and/or customers.
Can we change App name and/ or publisher name to meet marketing branding ? If you ask me till V18 it was not possible to change that and in V19 it is possible.
Lets see how it works.
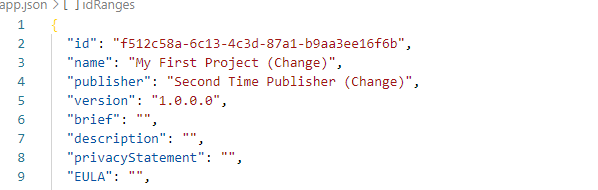
Here is my app.json file
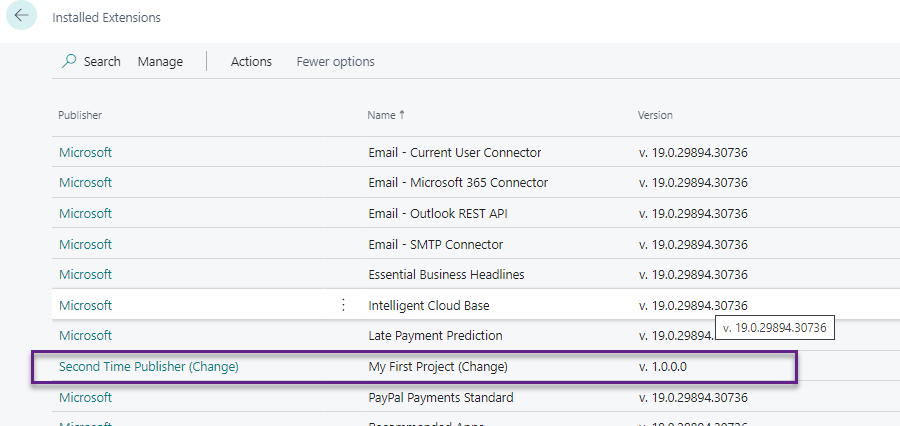
Publish the app
Changed the app.json
Hopefully this will help to give branding name to your app even after published.
With the release of Business Central Wave 2 2021 aka BCV19 lot of new features has been added to make life easier of developer and/or customers.
There is new feature added in business central to control address where country/region code is used.
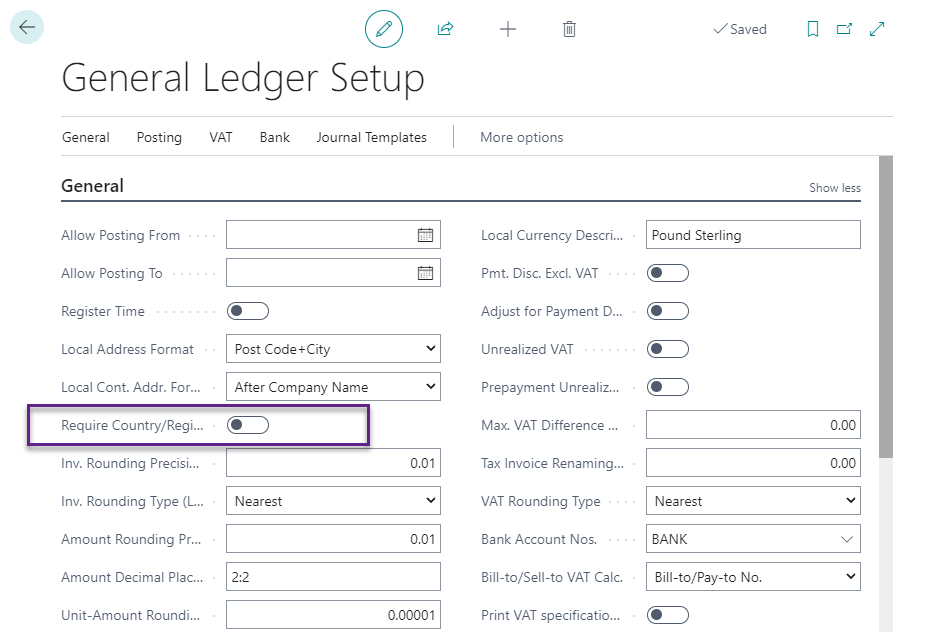
New option added on general ledger setup to control country/region code that means if this field is checked and if user change the country/region code then it will clear the values from related fields like city ,state and zip code.
Navigate to General Ledger Setup.
If the option is not ticked then following is behavior
If the option ins general ledger setup is ticked then it will not clear the address fields.
Hopefully it will help in controlling the address.
With the release of Business Central Wave 2 2021 aka BCV19 lot of new features has been added to make life easier of developer and/or customers.
Now days if you interacting with customer users sometimes customer want to update data from excel to the application directly. This situation occurs when customer have different resource to update the master data and those people actually preparing data based in excel and then key user update the data in application after reviewing. This is very much possible in business central by using configuration packages in business central.
But what if data is enter in excel and publish directly to business central.
Lets see how we can do that.
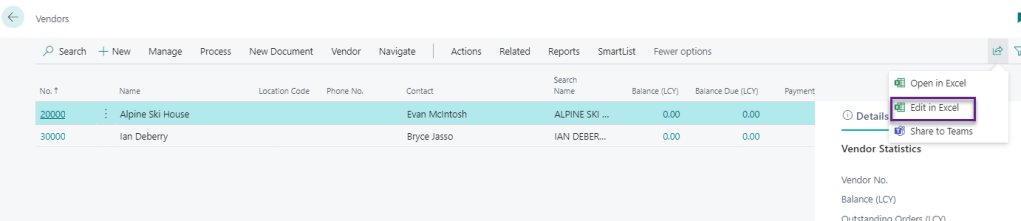
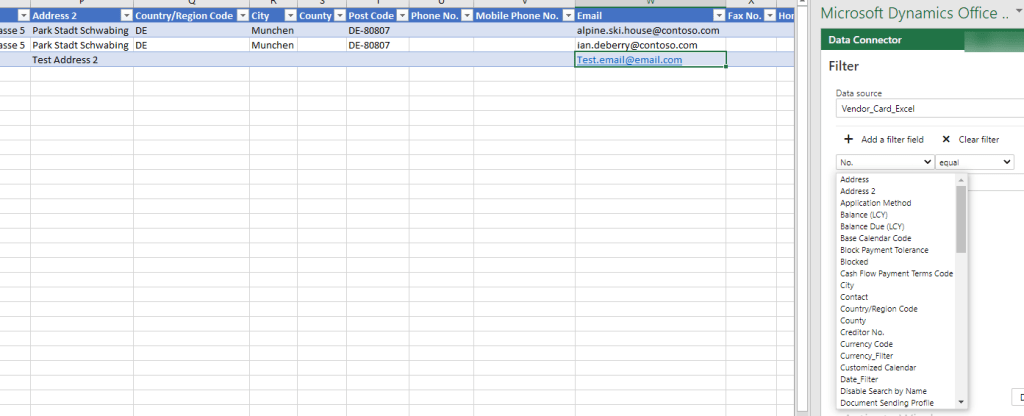
Open the vendor List and click on Edit in Excel as shown below.
Once you click on that it will download the file as below and the file showing Data Connector
If you look at the data connector then it has bunch of option to add new data ,refresh the data ,provide filters etc.
To add new data in the excel please click on ‘New’ and add the new vendor in the excel file.
Once you click on publish then it will upload the data in business central as below.
As well as it validate the required fields also . You can look at the Search Name field. How cool it is
On the data connector side there is lot of flexibility while entering data such as date field
Additionally we can filter in excel file as below.
With the release of Business Central Wave 2 2021 aka BCV19 lot of new features has been added to make life easier of developer and/or customers.
One of the important areas in business central is posting group which connect different module with finance management and user can see required values in chart of account after posting the transaction in actual time.
Sometime it happens user or consultant forget to set up required accounts in general posting setup and it pops up the error when posting an transaction. If you are experienced consultant then you will catch that immediately and add the required setup but if you are end user or beginner then you may need to juggle around the find the correct setup.
With the new release of business central while posting an transaction if some setup are missing then you will get proper error messages stating that this particular setup is missing.
Lets see how it works in real world scenario.
Removed the Sales Account from Posting Setup as below
Try to post Sales Order.
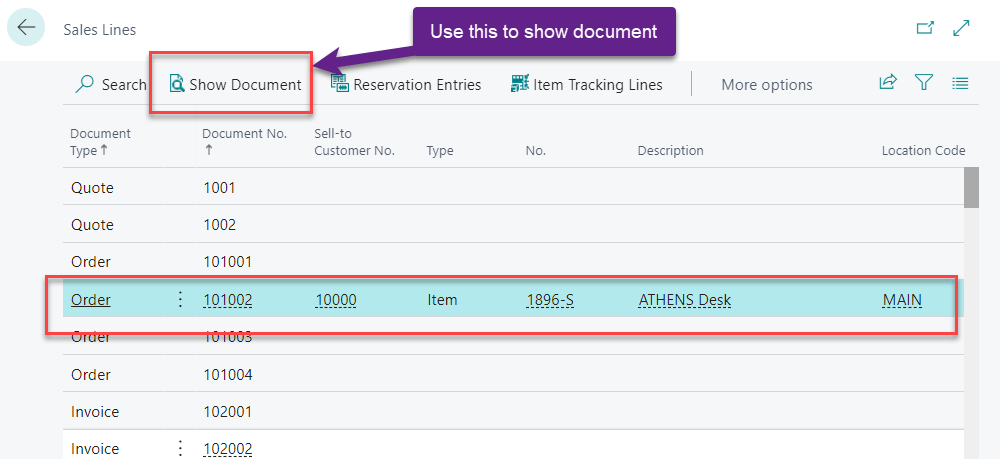
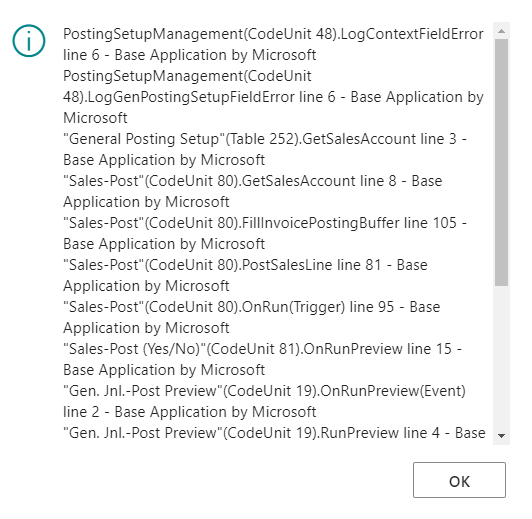
After Posting it throws an meaningful error message .
If you look at the error message it give more insight for the missing setup
Error Description This shows proper error description as follows and inform user where is the problem
Context This provides information regarding transaction line and once you click on that it will navigate to required lines and from there you can view the document.
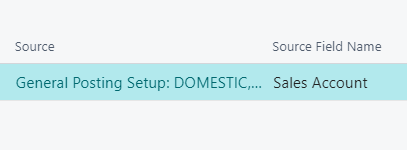
Source and Source Field Name This shows the source where in we need to correct the setup
Once you click on the source it will navigate to required setup page as below
Support URL This will navigate to Microsoft docs for more information
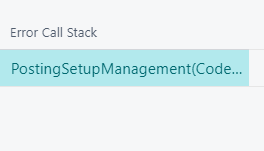
Error Call Stack .This will provide the information to developer to check from where this error pops up.
With the release of Business Central Wave 2 2021 aka BCV19 lot of new features has been added to make life easier of developer and/or customers.
Whenever there is an error from application and if we need to have help from partner or MS then we need to have detailed information about that error and prior to BC V19 we need to collect those information from different sources.
In BC V19 now we have detailed information regarding the error pops up on application.
To test this new feature build one action button as below
Once I click on this I got an error message as below
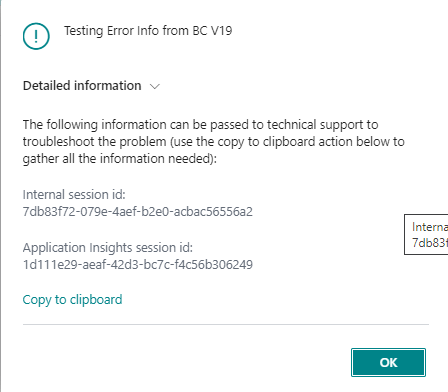
Now this error message can be expanded to see more details.
If you look at the above error message it provide technical information such as session id and Error description.
There is one more option is provided on that page is Copy to clipboard and once you click on that it will give more information of that error message as below.
Testing Error Info from BC V19

Internal session id:
7db83f72-079e-4aef-b2e0-acbac56556a2

Application Insights session id:
1d111e29-aeaf-42d3-bc7c-f4c56b306249

Client activity id:
d5ae47d2-2582-46e1-bcd0-8aab7ffd0223

Timestamp:
2021-10-05T02:57:39.9079548Z

AL call stack:
DataErrorTest(PageExtension 50101)."ErrorDetail - OnAction"(Trigger) line 2 - ALProject2 by Default publisher
In copied message it provide more information line AL Call stack, Timestamp etc. Basically I like the feature of showing AL call stack which will helpful to trace the exact location from errors is pops up.
This feature is not available for error message showing by using TestField function
With the release of Business Central Wave 2 2021 aka BCV19 lot of new features has been added to make life easier of developer and/or customers.
Till business central version V18 we are mentioning schemaUpdateMode in launch.json to specify how the data in app should behave when extension is published. In this property we were mentioning
ForceSync
Recreate
Synchronize (This is default value ).
As well as this schema update is used for testing and development and should not be used in production environment as it can disturb your data if the obsolete field is not properly handled.
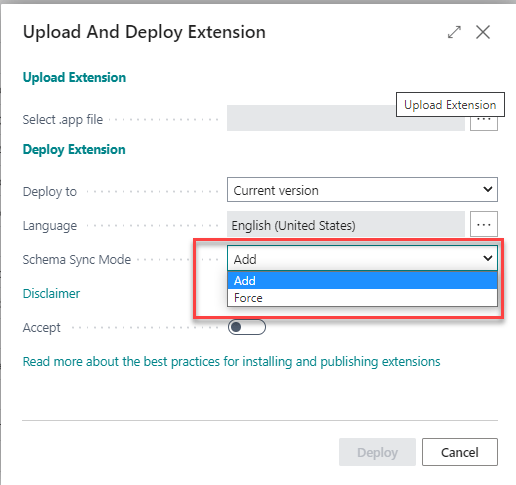
With the new version of business central new option added as below to sync the schema as below.
Add :- The add option will warn you if schemas are incompatible and will not apply the changes.
Force :- Force sync will overwrite the current schema with the new version without warning. Force sync can lead the data loss.
Please carefully use these options it can lead the data loss and without testing on sandbox don’t apply on production environment.
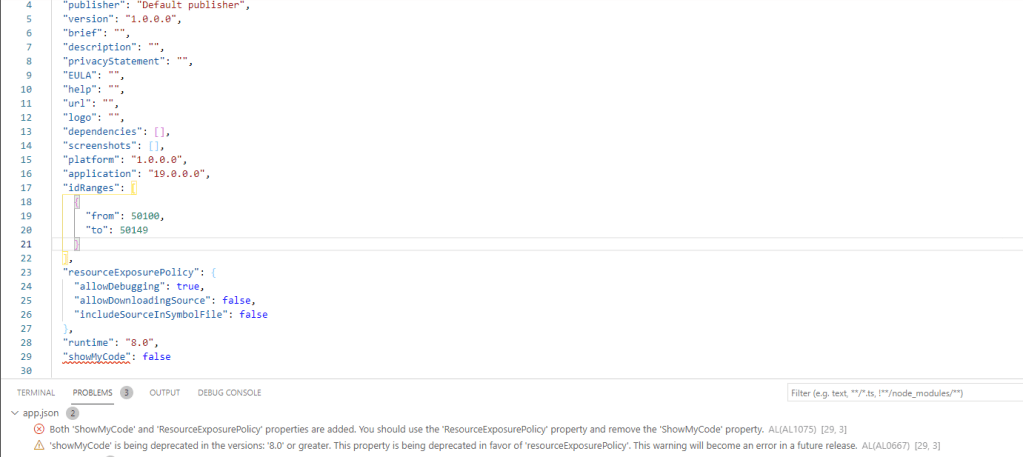
Do you remember this post where in I explain the use of showmycode property from app.json file. With this property we have only one option either we allowed to debug and download your app or vice versa.
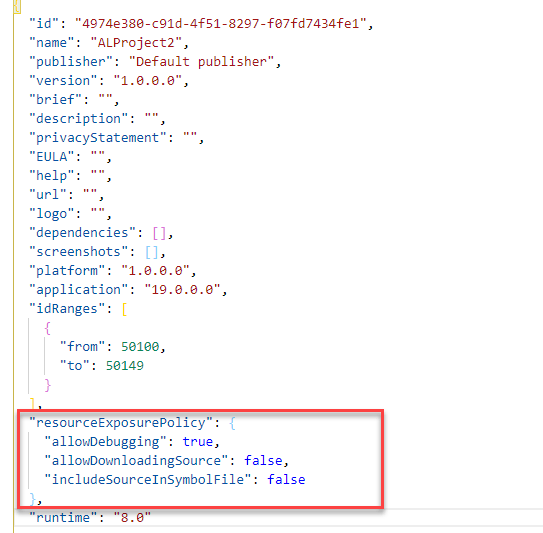
Now with new version of AL language this property has been deprecated and new property has been introduced resourceExposurePolicy where in we get leverage to control your app from debug ,download the app file.
This property will be automatically added when new project is created as below.
If you can see in this property we have three options which can be used to control the app and your IP.
AllowDebugging :- Allow to control the debugging of your app when it is published. The default setting is true.
AllowDownloadingSource :- Allow to control the download of your app source code .The default setting is false.
IncludeSourceInSymbolFile: Allow to control symbol to be included in the source code of package. The default setting is false.
Can I add resourceExposurePolicy and showmycode property together ?
With the introduction of this new property in app.json file we can not use showmycode property as it will show an error and warning as below.
Hopefully this will help us to control our IP and provide more security on our app.
Microsoft releases business central 2021 Wave 2 (BC 19) on 1st October 2021 .
This version is available on
Cloud
On Docker
On Premise
To check I tried to create new sandbox on cloud environment and it is readily available on my region too,.
Apart from this to get more detail and understanding on new version Microsoft already scheduled a launch event with breakout session .You can register here Business Central Launch Event
For On premise version you can download from following link
This week one of the customer post few transaction and found that one of the field user enter some wrong information. In ideal situation user need to reverse the transaction and post correct transaction which is safest approach.
But do you remember those old days where we have access to the table and can modify the data but with business central this ability no more available . I just build one small extension to modify the data in the table where in we can modify the posted data .
Important: It is not recommended to change data in the tables directly as it will cause inconsistency in database and make database vulnerable.
Just check following video to check small amount of work I did.
Two days back one of the customer asked me is there any way that I can post sales transactions using configuration package and I said yes it is possible to do that by using processing rules in configuration package. Today’s blog post will explain how it is possible.
In this blog post we will see how we can post sales transaction using configuration package.
Step 1:- Create configuration package for table sales header and sales line.
Step 2 :- Select required fields in each table .
I select required fields as below in each table as below
Step 3 :- Set the parent table id against Sales Line Table
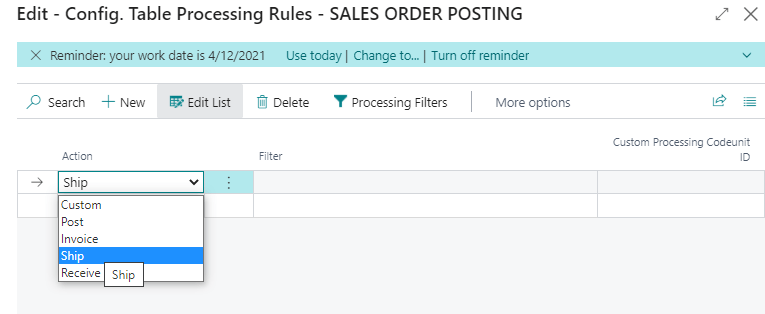
Step 4 :- Set up the processing rules.
Select table 36 and click on table –> Processing rules.
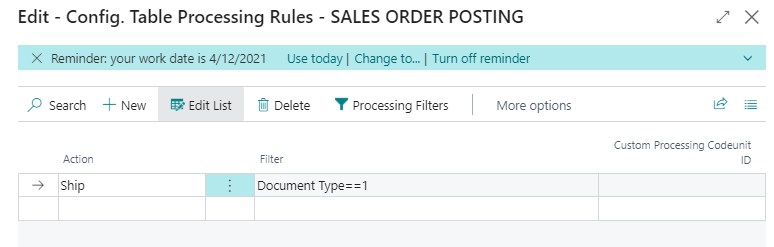
Step 5:- Set up Action and processing filters.
In Processing rules select desire action as below and set up processing filters.
I set filter for document type =order and set action as Ship
Filters
Action
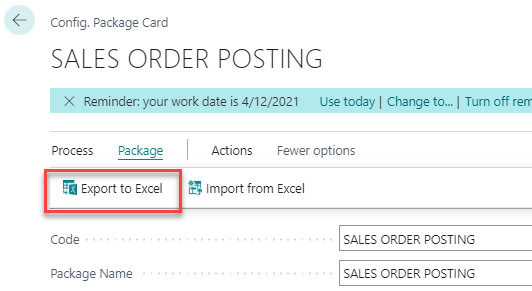
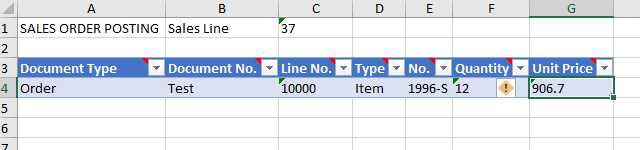
Step 6 :- Export the package in excel
Step 7 :- Add the required data in excel file
Step 8 :-Import the data back in package
Step 9 :- Apply the package
Step 10 :- Navigate to posted shipment to check the posted shipment.
That’s it so now we don’t need to write xmlport and code unit to import data and post.